Friday, September 27, 2013

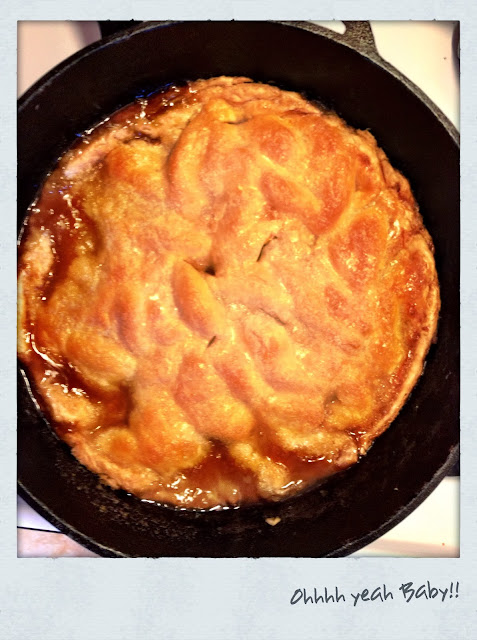
Cast Iron Cobbler

I come from a family of food lovers.  Foodies.  I guess we're kinda like "Carnies" from the Carnival, moving from fair to fair as they pass through this life looking for that next big adventure, or "Roadies" from a Rock 'n Roll band moving from city to city looking for the next outrageous gig.  Us Foodies move from meal to meal, looking for that next perfect bite.  It has often wreaked havoc on our Super Model status, especially since you don't even have to be pretty anymore to be a Super Model - you just have to be skinny.  (Seriously, have you looked in some of the magazines lately?  I'm talking some serious canine faces gracing those slick pages!! Bow Wow!)  And although Kate Moss claims "Nothing tastes as good as skinny,"  I'm guessing Kate Moss has never actually eaten anything tastier than tofu in her entire life.  'Cause that's just a ridiculous statement!!

Anyway.......

Naturally, when family comes to visit, it's generally expected that they bring a favorite recipe for us to try.  So when my aunt Teresa came to visit the week of my birthday, I fully expected to eat well.

Mmmmmmm....and I did.

She started by asking if we had a cast iron skillet.  But, of course.  Then one evening she whipped up a perfectly scrumptious berry cobbler in that heavy black cauldron, and it was good with and without ice cream.  She used a combination of blackberries, raspberries, and mulberries, so it had a slight tang underneath the sweet layer.  And the crust.....oh, mercy, the crust.  It was beyond words.  And we didn't even make the crust from scratch!! (I can hear the gasps already - don't judge me.  My sister makes really great pie crusts - mine are merely mediocre.)

I guess everyone has their favorite "flavor" of cobbler. And I reckon you can just about make cobbler from any fruit, so feel free to choose and use your favorite.  Part of the key here is to use FRESH or FROZEN fruit. You don't want to use canned pie filling.

 I've made this several times for church dinners, and the pan is scraped every time.  Those who weren't fast enough to get a portion of it are already requesting it for the next dinner.  I've had people request it with different fruit next time.  I've had the husband of a pregnant woman approach me and say "You know how when people in the church have a baby and y'all sign up to bring meals.  Well, we're about to have a baby, and when you sign up - you can forget the whole meal.  Just bring a pan of that stuff over and we'll call it good."

The thing is, the recipe is so easy, if  you an peel and slice peaches and apples; if you can rinse berries without drowning them, you can make this cobbler.  But you gotta get a cast iron skillet.  :-)


Cast Iron Cobbler    -     Preheat oven to 350

1 Stick Butter
1 Cup Brown sugar
Pie Crust (you'll need a top and bottom, so if you're making it from scratch, make sure you recipe gives you enough dough for two crusts)
Your choice of fruit:  Peaches - 8 large peaches
                                  Apples -  6 large apples (I like a combo of Granny Smith and Fuji)
                                  Berries - about 5 cups of berries (you can mix them up if you want)
3 TBSP lemon juice - optional if you're using peaches or apples, this will help keep them from turning brown
3/4 Cup white sugar
1/2 tsp cinnamon
1/2 tsp nutmeg (I like to grind it fresh right onto the fruit)
1 egg white
2 TBSP white sugar

Prepare your fruit.  Peel and slice peaches or apples.  I like to have pretty good chunks, so I slice them into about 10 pieces per fruit.  (You'll be able to see in the picture below.)  Toss with lemon juice. If you're using berries, just rinse your berries.  Gently stir in your white sugar and let rest for a few minutes while you start the crust.

Ummmm, that should say cast IRON, not iton.  LOL!
Melt your butter over medium heat in the cast iron skillet.


Turn the heat off, and stir in the brown sugar.


Place first pie crust on top of butter/brown sugar mix.


Gently pour the fruit on top of crust.  Sprinkle the cinnamon and nutmeg on top of the fruit (didn't take a picture of the sprinkle.  Sorry  :-@)

You can sort of get an idea of the size of my peach slices.


Place second pie crust on top and seal the edges.  

Some of your butter and brown sugar may ooze over the 
top of the crust.  It's Okay.  Don't sweat it


Lightly beat the egg white and brush it over the crust.


Cut a couple of vent holes in the crust, then sprinkle the last two TBSP of white sugar over the top.


Bake at 350 for 1 hour.  Voila!!  Cast Iron Cobbler.


Friday, June 14, 2013

My New Favorite

See all the chewey, gooey, goodness in these Winks??
Well friends, it's been a while....and I have lots of new recipes that I have grown to love over the past 11 months (WOW!!  How time flies!), but I must say, this is my new FAVORITE recipe that I've found in a long time.  It's a sweet little dessert bar - I think I'm going to name it "Mildred Winks".

See, I went to a family reunion back over Memorial Day.  You know how family reunions are - everybody brings what they think is their specialty, what they are going to get the most oooooh's and ahhhhhh's over, or what they think will be popular enough for folks to ask for the recipe.  Oh, and I HATE it when people are recipe snobs.  If you bring something for  people to eat, and everyone loves it and asks for the recipe, how you gonna say, "Hmmmmmmm.  It's a secret recipe."  Well then, I say, keep the dish a secret too!!

But anyway, I digress.  See, my cousin P.D. (everyone pronounces it Petey - and he's actually my mom's first cousin, which I believe makes him my first cousin, once removed) hosts a large gathering each year at his house way out in the boonies of Arkansas.   He and his son B-B-Q some of the best pig on the planet!!. And P.D.'s wife, Mildred is kind of in charge of the setting up and what-knot.  And you know, being the "hostess", (even if you're not crazy about having your husband's very large, and very loud family tromp all over your back yard) you feel like you have to really put on a good dessert show.  So upon arrival, Mildred has the dessert table in full swing, with several meringue pies, cobblers, a fancy fruit tray, and stuck down on the end - all by themselves - like, like maybe she thought people wouldn't be impressed - were these little dessert bar looking thingies.  They weren't anything fancy, and let me tell ya, Mildred must eat like a bird, cause they were cut into teeny-tiny little bites.  So since they were so small, geez, hardly nothing at all, really, I went ahead and popped one into my pie-hole.

Have mercy.  They were sooooo delicious.  And like nothing I had ever had before.  There was something in it that I could not identify, but it was tickling my tastebuds and they were begging for more.  So naturally, I went to track down the recipe.

Me: "Mildred!!  What are those bars?  They are so good!!  I can tell they have walnuts in them, but what else is in there?  It's not raisins, is it?"

Mildred:  (WINKS at me and shoots me a mysterious smile)  "They are good.  Aren't they?"  (Turns around and walks off!!)

Me:  Mouth opened, jaw dropped, just standing there looking like an idiot.......No Way!!  She is not going to tell me what is in them.  Is she gonna be a recipe snob???  (My head is spinning with indignation!!  After all, we are FAMILY!!)

So I proceed to find my mama - so I can tell on her.

As it turns out, Mildred was not a recipe snob, although, it took took a little bit of work to get the recipe out of her.  She just kept winking and smiling that smile.  'Bout drove me crazy!!  I guess she was thinking that turn about was fair play, because she said it took her 3 months to get the recipe from a co-worker.  Now 3 months of holding out on a recipe.........you're in very snobbish territory!!

But I won't keep you waiting any longer, here is the recipe for "Mildred Winks" - maybe you could just call them "Winks" for short!!

1 Box Yellow Cake Mix
1 1/2 sticks butter - MELTED
2 eggs
3/4 Cup brown sugar
1 tsp vanilla
Duncan Hines cake mixes are my favorite, but Aldi has a really good inexpensive yellow cake mix, also.
Mix all together until combined.  Then add:
See, it's a really thick dough.

2 cups chopped dates (Ahh-ha!!  The ingredient I couldn't identify)
2 cups English walnuts

Stir until evenly distributed.  It will be very, very thick - more like cookie dough than cake batter.  Spread (or pat with your fingers) in a 9 X 13 pan and bake for 35 - 40 minutes.  Check it at 35, don't over cook it.


Pat-a-cake, pat-a-cake baker's man.......


Obviously, these are great for a family reunion, or a work place luncheon, or a church dinner.  They also make great bake sale items individually wrapped.  Or, you can make them for yourself and your family.

I would tell ya that they will keep for a couple of days in an airtight container at room temperature - but they never last that long around my house.  ENJOY!!!

I cut mine a little bigger than cousin Mildred!!


Tuesday, July 31, 2012

Woooooooo, PIG SOOOOOIE!!

Ham and bacon.  Oooh, and Boston Butt.  Ummmmm........and pork steak and tenderloin.  And bacon.  And...ham.  Just call me Miss Piggy.  Oh well, I am from Arkansas, where we have a long tradition of Hog Fever, and we bleed Razorback Red.

As of this writing, my Kroger has their Smithfield Ham Portions on sale for .99 cents a pound!!  Wowzers!  So I picked up a couple of smaller portions.  I came home and cooked one, and put the others in the freezer.  Since it's just Derrick and me, I looked for portions in the 5 - 7 lb range.  Now, my family usually only eats large bone-in hams at Christmas, and I prefer mine cold.  Well, that was before tonight.  I don't think I'll ever  eat cold ham again.

Now, where I come from, Southern Mamas everywhere are well-known for making a sweet ham glaze using a good old can of Coca Cola.  I didn't have a can of Coca Cola, and although I did have a Pepsi, I felt that would almost be a sacarilege.  So keep reading for my substitute that will become my "go-to" soda for a ham glaze.

I was trying to think of a Quitschie little name for this ham, but seriously, it's just the best darn ham I've ever eaten.  So I guess that's what I'll call it, "The Best Darn Ham."  Here's how you do it:

1 "ready to cook" bone-In ham, (mine was about 6 lbs)
3/4 cup brown sugar (OK, you know me, I don't really measure, so give-or-take)
3 TBSP whole grain mustard
3 TBSP yellow mustard
2 good healthy tsp ground horseradish
1 can Dr. Pepper (yes, Dr. Pepper)

Preheat your oven to 350.  Line your baking pan well with foil (just to make clean-up easier).  Place your ham cut side down in the pan.  If you have a nice layer of fat exposed, score your fat layer with a diamond pattern.  Mix the brown sugar, both mustards and horseradish.  Again, I don't measure anything, so the amounts above are approximates.  What you want is a nice, thick consistency, that cascades smoothly from your spoon.  (See picture below.)  Pour the Dr. Pepper over the ham, followed by the brown sugar/mustard mixture.  Tent the ham with foil and secure the foil over the sides of the pan.  Bake at 350 for about 20 minutes per pound, so for my 6 lb ham, about 1 hour 20 minutes.  Get  your taste buds ready, cause this little piggy is gonna go wee, wee, wee all the way home!!

 The "all important" glaze ingredients:  Stone Ground Mustard, Yellow Mustard, Fresh Ground Horseradish,and a can of Dr. Pepper.


                                                         I started with a 6 lb ham portion.


                                                Pour that Dr. Pepper right over the top.


                                         This is how your glaze should cascade off your spoon.


                                                          Pour the glaze over the ham.


                                      The finished product.  See the "scored" fatty layer.  Yummy!

With the drippings left in the pan, you can pour it in a sauce pan, add a pat of butter, and simmer it down a little.  After I cut my ham, I dipped it back in the sauce for about 20 seconds before I put it on my platter.  It's just the best darn ham I've ever eaten.  Hope you enjoy it as well!!


Tuesday, May 8, 2012

BEST Sunday Dinner

I love Sunday dinners. Getting home from church and having dinner almost ready in a crock-pot. Just add a few things, and voila, dinner on the table in no time!!

 So last Sunday morning, I got up a little early, because I wanted to try a new chicken dish I had seen posted on Pinterest. Now, I'm no expert at Pinterest, but, I have been playing around with it long enough to know that if you see something you like, you'd better A) Like it, B) Comment on it, C) Re-post it, D) Print it, or E) All of the previous. Naturally, I had done none of those things. Needless to say, I could not find my recipe. So, never fear, I took it upon myself to make up my own. I call it "Chicken A La Quitsch". Catchy little title, yes? Thank you very much.  And it really was the BEST Sunday Dinner I've made in a long time.

 It has a very Italianish/Mediterraneanish flair to it. But which ever way you want to lean, it was delish!! So here we go!

 Chicken A La Quitsch 

 2 Bone-in/Skin-on Chicken Breasts
1 envelope Italian Dressing seasoning
1 can artichoke hearts
1 can large black olives
Drizzle of olive oil

 Place the two chicken breasts in the crock pot and drizzle with the olive oil. Drain about half the liquid off the artichoke hearts, and dump them in. Sprinkle the Italian Seasoning packet over the top. Turn the pot on high, and cook for 3 hours. (See, perfect recipe to start before Sunday School - about 9:00 - done by Noon!!)

 OK, at about the 3 hour mark, drain the olives, and dump them in. Put the lid back on and continue to cook for about the next 16 minutes.

 Now at this point, I put on some linguine noodles (water to boil - about 8 minutes, noodles to cook - about 8 minutes)

 I also opened a can of peas and carrots. Yes, fresh or frozen is WAAAAAY better, but that chicken smelled so good, it was messing with my brain.

 I also opened a jar (GASP!!!) of Alfredo Sauce. Now I can make my own, but that would be for a Saturday Supper, not a Sunday Dinner.

 By the time the peas and carrots were heated and the sauce was bubbling, the noodles were done, and it was time to eat!! Boo-yah!

 I did pull the meat off the bones of the chicken and sort of cut it up in big chunks, but you wouldn't have to. Oh, and a friend at work snarled her nose up at the black olives (what ev, Maria!!) - so you could leave those out. Although, you would totally be missing out.

 OK, what are you waiting on? Go!! Go thaw you some chicken breasts! Bon Appetit!

Wednesday, February 15, 2012

So.....who LOVES Peanut Butter Cookies?


Mmmmmmm.....the best taste of peanut butter has to be the first fresh, smooth swipe off the top of a newly opened jar. I have fought past roommates for that first taste. Did you know that Peanut Butter is actually native to the Americas, dating back to the Aztecs? They used to grind roasted peanuts down into a paste, thick and probably not real spreadable, and not as sweet as we like it.

George Washington Carver is credited with the modern day invention of peanut butter. In fact, you may call him a peanut expert (and you thought Jimmy Carter held that moniker). He wrote 44 practical bulletins for farmers, in which he included more than 100 peanut recipes. He also kept busy inventing products made from peanuts; everything from cosmetics and paint to plastics and gasoline. Man, where is that formula now,and will my car run on it?


Now whether your preference is smooth or crunchy, you'll garner all the health benefits that peanut butter packs: protein, folate, B3, and antioxidant-p coumaric acid. Watch your labels though, some brands do contain partially hydrogenated oils, and we don't want those pesky trans fatty acids clogging our pipes.

OK, are you ready for the easiest peanut butter cookie EVER??? Are you? Are you ready? Here is the complete recipe. Wait for it......wait for it......

1 Cup Peanut Butter
1 Cup Sugar
1 Egg

The End.


Wait --- what? Yep, that's it. Three little ingredients. 1 cup, 1 cup, 1 egg. Mix it all together, drop on a cookie sheet, and bake at 350 for 10 minutes. You can do the little criss cross thingie if you want. The explanation for those would take a whole entry by itself; but it is interesting if you want to do some reading up on the theories behind it.

Saturday, September 10, 2011

Saving money with The Quitsch Kitch

OK, so everyone knows that I've learned to coupon and have been avidly using coupons since the beginning of the year. I actually started before the whole "Extreme Couponing" thing started on TV, which is a-whole-nother can of worms.....don't get me started.

Anyway, I came across a really good deal at Kroger this week for Pillsbury Crescent Rolls and Pillsbury ready to bake Cinnamon Rolls. Yes, the kind in the can. Some of you may be surprised to hear that The Quitsch Kitch uses refrigerated cinnamon rolls and doesn't make her own. Please, people!! While The Quitsch Kitch can (and has) made delicious homemade cinnamon rolls, and enjoys doing so, Mr. Quitsch Kitch couldn't honestly care less, so when he is the main partaker of the cinnamon roll, The Quitsch Kitch is glad to pop open a can!!

However, I digress. I found a good deal on them at Kroger - the small cans (of both Crescent*4 count and Cinnamon Rolls*5 count) were on sale 10/$10 - making them $1.00 each. I had coupons for .50/2 - which my Kroger doubles to $1.00, essentially making each can of Crescents and Cinnamons .50cents each. So basically, I was getting a full roll of 8 of the crescents for $1.00, and I was getting a big roll of 10 cinnamon rolls for $1.00.

When I got my bonanza of breads home, though, I quickly realized that I didn't have enough room in my fridge (let's face it, 16 cans of crescent rolls - even the small ones take up a lot of space!!) What's a girl to do?? I quickly thought about how I could salvage my money saving deal without overloading Mr. Quitsch Kitch on crescents and cinnamon rolls every meal this week.

I went to my storage drawer and retrieved my handy-dandy roll of waxed paper and gallon sized freezer bags, and went to work. I popped open each can of crescent rolls, and rolled each "naked" roll individually in waxed paper, then placed them in the freezer bag. I was able to get 8 individually wrapped rolls in one gallon sized freezer bag. I did the same thing with the cinnamon rolls - and yes, I wrapped the icing up with them. I was able to get 4 wrapped rolls of the cinnamons in a gallon freezer bag. I labeled the bag with the date and contents. Now when I the make Mr. Quitsch Kitch happy, I'll just pull out a roll of waxed paper and bake. I imagine I will have to allow for thawing time for the crescents, but it's a small price to pay. I do love saving money!!


Tuesday, July 19, 2011

Long Live the Queen.....Queen Margherita, that is.


Nope, I didn't misspell it, I'm not talking about the drink. I'm talking about the pizza!! Margherita Pizza. You may or may not have heard of it....I had never heard of it until I took my first cruise, and it was available in the Pizzeria 24 hours a day. It was very popular, they almost never had it already made. You always had to wait on it. That was OK though, because that meant it was always FRESH!!

Now it's a funny name for a pizza, and it gives nothing away about the ingredients (unless you happen to be an expert in Italian history...or you've cheated and used Google). But as I've already hinted at in the title, the pizza is named after Queen Margherita, wife of King Umberto I, who ruled Italy from 1878 to 1900 (it coulda been longer, but he was assassinated during a time of social upheaval). But I digress....In 1899, Queen Margherita visited Naples to escape a cholera epidemic in Northern Italy. Italian Chef Raffaelle Esposito wanted to honor the Queen with a special meal. He concocted a pizza made with Tomatoes, Mozzarella Cheese, and Basil - the colors of the Italian Flag: Red, White, and Green. Queen Margherita liked the pie so much, it is said she hand wrote a note to the chef thanking him for the pizza. The rest, as they say, is history.

You can recreate the famous meal in your own kitchen. It's super easy when you use already made dough.

Margherita Pizza -- Preheat oven to 375.

1 8 oz can of Crescent Rolls (or substitute your favorite refrigerated dough -
I used the reduced fat crescents)
2 TBSP olive oil
2 cloves garlic
1 Cup + 1/4 Cup Mozzarella cheese (divided)
2 Roma tomatoes, sliced (or your favorite variety)
2 pinches sea salt
2 TBSP chopped fresh basil

Unroll the crescent rolls and divide into two rectangles. Pinch seams together. Brush each rectangle with 1 TBSP olive oil. Press 1 clove garlic over each rectangle. Sprinkle dough with 1 cup of Mozzarella cheese. Lay tomato slices on top of cheese, overlapping slightly. Sprinkle tomatoes with a pinch of sea salt. Top tomatoes with the left over cheese. Bake at 375 for 12 - 15 minutes. Sprinkle with fresh basil when you remove from the oven.

Oh this makes me want to go on a cruise!!!!